


Youtubeသီခ်င္း၇ဲ႕မူ၇င္းကုဒ္သစ္ေပါ့ေနာ္။အေဟာင္းကုဒ္ကမ်ားပါတယ္။
- <iframe width="425" height="349" src="http://www.youtube.com/embed/Azy3WXSjF0o" frameborder="0" allowfullscreen></iframe>
- <iframe width="425" height="349" src="http://www.youtube.com/embed/Azy3WXSjF0o&autoplay=1" frameborder="0" allowfullscreen></iframe>

MAC address ေျပာင္းနည္း
က်ေနာ္႔ကို MAC Address ဆိုတဲ႔ (physical address) ကို ေျပာင္းတဲ႔ နည္းေမးဘူးတယ္။ Media Access Control address တဲ႔ ။ အလြယ္ေျပာရင္ေတာ႔ Network card ရဲ႕ ေျပာင္းမရတဲ႔ Serial number ေပါ႔။ (အခု ထြက္လာတဲ႔ Mother board ေတြက LAN board ေတြ build on ပါၿပီးသား ျဖစ္တဲ႔အတြက္ mother board number လို႔ ေခၚၾကပါတယ္) ။ network ကုမၸဏီ တစ္ခုမွာ အင္တာ နက္ သံုးဖို႔ form တင္ရင္ MAC address ကို ေတာင္းပါတယ္။ ေျပာင္းမရတဲ႔ Number ဆိုေတာ႔ ႏွစ္ ေယာက္ ခြဲသံုးတာတို႔ တစ္ျခားကြန္ပ်ဴတာမွာ အဲဒီ account ကို သံုးတာတို႔ ဆိုရင္ သိရေအာင္ပါ။ အဲဒီ နံပါတ္ကို ဘယ္လို ၾကည္႔ရမလဲ ဆိုေတာ႔ ... မသိေသးတဲ႔ လူေတြ အတြက္ပါ။ မိမိရဲ႕ connection area ထဲက Local Area Connection ကို right click လုပ္ၿပီး properties ႏွိပ္။
support ဆိုတဲ႔ tab မွာ ၾကည္႔လုိက္ပါ။

အဲဒါကို ေျပာင္းခ်င္တယ္ ဆိုရင္ေတာ႔ ေအာက္က Software ေလးကို သံုးႏိုင္ပါတယ္။ ဘယ္လို သံုးမယ္ ဘာအတြက္ သံုးမယ္ ဆိုတာေတာ႔ မေျပာေတာ႔ဘူးေနာ္ ....

သံုးနည္းကေတာ႔ လြယ္ပါတယ္။ အေပၚမွာ ၀ိုင္းျပထားတဲ႔ ေနရာေလးမွာ မိမိေျပာင္းခ်င္တာေလး ထည္႔ေပးလိုက္။ ဒါမွ မဟုတ္ Random ဆိုတာေလး ႏွိပ္ၿပီး ေျပာင္းေပးလိုက္။ ၿပီးရင္ Restart Adapter ကိုပဲ ျဖစ္ျဖစ္၊ Update MAC ကို ပဲ ျဖစ္ျဖစ္ ႏွိပ္ေပးလိုက္ရင္ ေျပာင္းသြားေရာ ... လြယ္ပါတယ္။ အသံုး၀င္တဲ႔ လူေတြ ရိွၾကမွာပါ။
လက္ရိွအသံုးျပဳေနတဲ႔ ၀င္းဒိုးကို (အခုမွ တင္လိုက္တာပဲျဖစ္ျဖစ္၊ သံုးတာၾကာေနၿပီပဲျဖစ္ျဖစ္) မလိုအပ္တဲ႔ လုပ္ေဆာင္မႈေတြ ျဖဳတ္ပစ္ၿပီး မိမိကြန္မ်ဴတာကို performance တိုးလာေအာင္ လုပ္ၾကည္႔တာပါ။ တကယ္ျမန္လား မျမန္လား ကိုယ္တိုင္စမ္းသပ္ၾကည္႔ေပးပါဦး။ အခုလုပ္မွာက မလိုအပ္တဲ႔ လုပ္ေဆာင္မႈ ေတြ ကို disable လုပ္ထားၿပီး RAM စားသက္သာေအာင္ လုပ္တာျဖစ္လို႔ အႏၱရာယ္ကင္းပါတယ္။
၁။ ေအာက္က
registry ဖိုင္ႏွစ္ခုကို run ေပးပါ။ windows ရဲ႕ ပံုမွန္လုပ္ေနတဲ႔
အလုပ္ေတြကို safe ျဖစ္တဲ႔ အျမန္ဆံုး Value ေျပာင္းေပးဖို႔ပါ။ (rar
ဖိုင္နဲ႔ ခ်ဳံ႕ထားတာပါ။ ျဖည္လိုက္ရင္ reg ဖိုင္ရလိမ္႔မယ္။ Double-click
ႏွိပ္ေပးလုိက္ပါ)
Download link ~ Restore Default Settings
၂။ Desktop ေပၚမွာ Right-click လုပ္ၿပီး Properties ကို ႏွိပ္ေပးပါ။ ၿပီးရင္ Appearance tab ထဲက Effects uncheck လုပ္ေပးပါ။ (uncheck လုပ္ရမွာေတြကို အနီနဲ႔ျပၿပီး check လုပ္ရမွာေတြကို အျပာနဲ႔ျပပါ႔မယ္)
a.) Use the following transition effect for menus & tooltips.
b.) Show shadows under menus. ကိုႏွိပ္ပါ။ ေအာက္မွာ ေရးေပးထားတဲ႔ functions ႏွစ္ခုကို

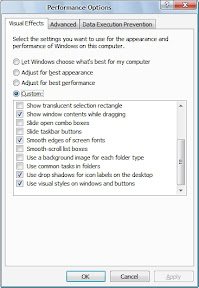
၃။ My Computer မွာ Right-click လုပ္ၿပီး Properties ကိုႏွိပ္ပါ။ (Shortcut key ... Win+Pause/Break )
Advanced tab ထဲမွာ Performance section ေအာက္က Settings ကိုႏွိပ္လိုက္ပါ။
Visual Effects tab ထဲက မလိုအပ္တာေတြ Disable လုပ္ပစ္မွာျဖစ္ပါတယ္။ Custom ကိုႏွိပ္ၿပီး ေအာက္က ငါးခု ထားခဲ႔ပါ။ က်န္တာ disable ေပးလိုက္ပါ။
a.) Show window contents while dragging
b.) Smooth edges of screen fonts
c.) Use common tasks in folders
d.) Use drop shadows on icon labels on the desktop
e.) Use visual styles on windows and buttons
၄။ Tools - Folder Options က View tab click ပါ။ ေအာက္ပါ Options မ်ားကို ျဖဳတ္ေပးပါ။
a.) Automatically search for network folders & printers.
b.) Display file size information in folder tips.
c.) Display simple folder view in Explorer's Folders list.
d.) Show encrypted or compressed NTFS files in color.
e.) Show pop-up description for folder and desktop icons.
f.) Use simple file sharing.

၅။ RUN ထဲမွာ msconfig လို႔ ရိုက္ထည္႔ၿပီး။ Start up ထဲက မလိုအပ္တာေတြ Disable ေပးလိုက္ပါ။ က်ေနာ္ကေတာ႔ Disable All ပဲ ေပးလိုက္တယ္။ Kaspersky လို Anti ေတြက သူ႔ဘာ သာ ျပန္ check လုပ္ေပးေပမယ္႕ NOD 32 လိုေကာင္ေတြက ကိုယ္ျပန္ဖြင္႔ေပးမွ Start up ျပန္ျဖစ္ပါ တယ္။ VGA driver ေတြကိုလည္း disable ေပးလိုက္တာ ပိုေကာင္းပါတယ္။ (၀င္းဒိုးအတြက္ လိုအပ္ တဲ႔ driver က System 32 ထဲေရာက္ၿပီးသားပါ။ Start up ထဲပါေနတာက သူ႔ရဲ႕ အျခား performance ေတြျဖစ္ပါတယ္ ) Disable All ေပးလိုက္လို႔ ျပႆနာ တက္သြားမွာ မရိွပါဘူး။
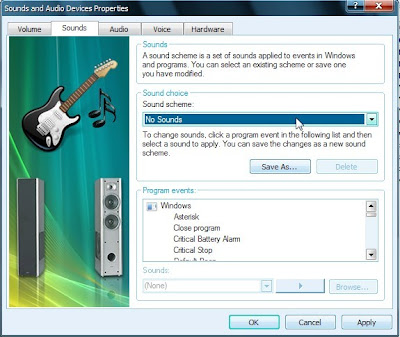
၆။ Control Panel ထဲက Sound & Audio Devices ကိုဖြင္႔ပါ(or type mmsys.cpl in RUN)။ Sounds tab ထဲမွာ No Sounds ေပးလိုက္ပါ .. Sound Scheme section ထဲမွာ ရိွပါတယ္။ အားလံုးမျဖဳတ္ခ်င္ဘူး အသံေလးေတြ Alert ေလးေတြ ႀကိဳက္တယ္ဆိုရင္ေတာ႔ ထားႏိုင္ပါတယ္။ ဒါေပမယ္႔ ေအာက္က ေလးခုကိုေတာ႔ No sound ေပးထားသင္႔တယ္။
Exit Windows, Start Windows, Windows Logoff, Windows Logon
(က်ေနာ္ေျပာခဲ႔သလိုေပါ႔ ... အသံပါမွ ႀကိဳက္တယ္ဆိုရင္ေတာ႔ ထားႏိုင္ပါတယ္။ မိမိအဆင္ေျပဖို႔က အဓိကပါ။ အရမ္းႀကီး ေလးသြားတာမွ မဟုတ္တာေလ)
အားလံုးအဆင္ေျပလြယ္ကူမယ္ထင္ပါတယ္။ အခုမွ စဖတ္တဲ႔လူေတြလည္း က်ေနာ္ေျပာတဲ႔ေနရာေတြ ရွာေတြ႔ၾကမယ္ထင္ပါတယ္။ အဆင္ေျပၾကပါေစ ..
ျပီးပါျပီခင္ဗ်ာ...
No comments:
Post a Comment